Menu

Thursday, March 8, 2012

Network Related Linux Commands


All the network related files and information are in

/etc/sysconfig/network-scripts/ifcfg-eth0
/etc/sysconfig/network
/etc/resolv.conf

Here is the list of network related comments
How to start and stop the network service?
# network service start
# network service stop
# network service restart


IP Address:
A unique address used to identify the computer or a device which is on the TCP/IP network.

Format of IP Address:
xxx.xxx.xxx.xxx   32 bit numeric address. Ex: 192.168.90.23

IP Address Classes:
A, B, C, D and E
Class A 1.0.0.0 to 127.255.255.255
Class B 128.0.0.0 to 191.255.255.255
Class C 191.0.0.0 to 223.255.255.255
Class D 224.0.0.0 to 239.255.255.255
Class E  240.0.0.0 to 255.255.255.255

Private IP address:
An IP address which is visible only to the private network (LAN).
    From 10.0.0.0 to 10.255.255.255
    From 172.16.0.0 to 172.31.255.255
    From 192.168.0.0 to 192.168.255.255

Linux commands - traceroute


traceroute

This command is used track the path of the packets which travels across the network from the starting location to the target host.

Example:
# traceroute [options] [target-host]
# traceroute learnjavajee.blogspot.com


Linux command - whois


whois

This command is used to query the information of the specific domain

Example:
# whois yahoo.com
# whois google.com


Linux command - nmap


nmap

It is a networking exploration tool and security scanner. This is very useful tool to determine the running services on a specific host and its status.

# nmap [taget-host]
# nmap localhost

Linux Command - ping


Ping

This command is used to check the specific host is reachable or not.

# ping 192.168.0.92
# ping yahoo.com

Linux Command - netstat


netstat – Network Statistics

This command is used to display all the network connections, routing tables and number of network interface.

Example:  The below command list all the java instance running on the system
# netstat --all --programs --numeric | grep java
# netstat –apn | grep java


How to check whether the specific port is listening on the system?
# netstat --listening  --numeric –programs | grep port_number

Example: To check whether 8080 port is listening
# netstat --listening --numeric –programs | grep 8080
# nestat –lnp | grep 8080


Some important options in netstat command
# netstat --all                  
# netstat --route          
# netstat --interfaces


Wednesday, March 7, 2012

Linux Command - ifconfig


Ifconfig 
This command is used to configure the network interfaces on the Linux system. The configuration files for each Ethernet Interfaces will be in the below location

/etc/sysconfig/network-scripts/

Syntax:  
# ifconfig [interface]

Example: The below command will display the information of the first “Ethernet Interface”.
# ifconfig eth0


"ifconfig" command without any option will list all the active Ethernet connections.
# ifconfig


This command with "-a" option list all the interfaces including interfaces which are down.
# ifconfig –a


Eth0 – First Ethernet Interface
Lo – Lookback Interface
Sit0 – First Simple interface Traslation


How to bring the specific network interface up and down?
Syntax: 
# ifconfig [interface] down/up

Example: 
# ifconfig eth0 down
# ifconfig eth0 up


# ifdown [OPTIONS] interface-card

Example:
# ifdown eth0
# ifdown eth0:1


# ifup [OPTIONS] interface-card

Example:
# ifup eth0
# ifup eth0:1


Type "man ifconfig" for more information about the this command.

Tuesday, March 6, 2012

How to assign multiple IP addresses to a single Network Card Interface


Step 1: Find out how many physical NIC on the system
# ll /etc/sysconfig/network-scripts


Consider you have one Ethernet device "eth0" and would like to add more IP addresses (alias) for the same.

In this example, I have assigned "192.168.0.90" and "192.168.0.88" to my primary (physical) Ethernet device.
192.168.0.91 eth0    primary (Physical NIC)
192.168.0.90 eth0:1 alias1     (Virtual NIC)
192.168.0.88 eth0:2 alias2     (Virtual NIC)


Step 2: Copy the eth0 file

# cp /etc/sysconfig/network-scripts/ifcfg-eth0 /etc/sysconfig/network-scripts/ifcfg-eth0:1
# cp /etc/sysconfig/network-scripts/ifcfg-eth0 /etc/sysconfig/network-scripts/ifcfg-eth0:2


Step 3: Edit the ifcfg-eth0:1 and ifcfg-eth0:2. Change the device name and the IP address.

# vim /etc/sysconfig/network-scripts/ifcfg-eth0:1

# vim /etc/sysconfig/network-scripts/ifcfg-eth0:2


Step 4: restart the network service

# service network restart


Step 5: Type ifconfig command to verify the network interface configuration and to check the all the IP addresses are running.

# ifconfig


Assign an IP address to the Linux system


How to assign an IP address to the Linux system?

Step 1: Edit the network scripts file. All the network related script files are in the below location
# ls /etc/sysconfig/network-scripts


 My system has only one Ethernet card. The file that need to be edited to assign the IP address is “ifcfg-eth0”.

If system has multiple Ethernet devices, the files will be like “ifcfg-eth0, ifcfg-eth1, ifcfg-eth2…”.

Step 2: Edit the Ethernet device file and add the IPADDR, GATEWAY, PREFIX/NETMASK…etc. as mentioned below.
# vi /etc/sysconfig/network-scripts/ifcfg-eth0


Step 3:  Bring down the network interface device and then start it.

# ifdown eth0
# ifup eth0

Or else just simply restart the network device.
# network service restart

Step 4:  Type ifconfig to view the available network interface card.

# ifconfig


Step 5: Try to ping this IP address from the other system.


Wednesday, January 11, 2012

How to install Httpd on windows?


Step 1:  Download the windows version of the httpd from the official site. http://httpd.apache.org/download.cgi.   

The file that I downloaded was httpd-2.2.21-win32-x86-no_ssl.msi

Step 2: Run .msi file which will open a wizard. Follow the instructions given in the wizard to complete the installation.


Step 3: Once it is successfully installed, the Apache Service Monitor icon will be shown on the windows task bar. Use this to monitor the httpd server status.


Step 4: By default the httpd runs on port 80. Try this URL http://localhost:80 on the browser to verify the installation.

Tuesday, December 20, 2011

Send mail From Java using Gmail Server as a SMTP server

package com.mail;

import javax.mail.Authenticator;

import org.apache.commons.mail.DefaultAuthenticator;
import org.apache.commons.mail.EmailException;
import org.apache.commons.mail.HtmlEmail;

public class ApacheHtmlEmail {
    public static void main (String[] args) {
        System.out.println("starts");
        
        String userName = "YourGmailAccount@gmail.com";
        String password = "YourGmailAccountPassword";
        
        HtmlEmail email = new HtmlEmail();
        email.setHostName("smtp.gmail.com");        
        email.setSmtpPort(587);
        email.setTLS(true);
                
        Authenticator authenticator = new DefaultAuthenticator(userName, password);
        email.setAuthenticator(authenticator);
        
        try {
            email.setFrom("YourGmailAccount@gmail.com");
            email.addTo("ToAddress@AnyProvider");
            email.setSubject("Subject");
            email.setTextMsg("Body of the message");
            email.send();
        } catch (EmailException e) {
            e.printStackTrace();
        }
        
        System.out.println("Ends");
    }
}

Tuesday, November 29, 2011

Install LDAP on Linux system using yum


How to install Open LDAP on Linux System?
# yum search openldap-server

The above command will list all the packages that are matched with the “openldap-server”. The version of the package is based on the Linux version installed on the system. 


yum install openldap-servers.i386

The above command will install the LDAP server and its dependencies.


How to start the LDAP server?
Here is the 3 ways to start the LDAP server.
# service ldap start
# /etc/init.d/ldap start
# /sbin/service ldap stop


How to stop the LDAP server?  
Here is the 3 ways to stop the LDAP server.
# service ldap stop  
# /etc/init.d/ldap stop   
# /sbin/service/ldap stop


How to check LDAP server is running on the Linux system?
Here is the 3 ways to check the status of the LDAP server.
# service ldap status  
# /etc/init.d/ldap status   
# /sbin/service/ldap status


What is the default port for the LDAP server?
The default port over TCP is 389. LDAP over SSL is 636.


How to change the default port of the LDAP Server on Linux System?


How to uninstall the LDAP from the Linux system?
yum remove openldap-servers.XXXX  (where XXXX is the version of the LDAP package)
Example: # yum remove openldap-servers.i386

Monday, November 28, 2011

Installing SMTP server - Sendmail on Linux


Simple Mail Transfer Protocol is an international standard to send mails between servers using Internet Protocol (IP). 

“sendmail” is an application on the Linux system which uses SMTP to send mails.

How to install SMTP on Linux?
# yum install sendmail

How to start the SMTP service on Linux?
# service sendmail start    OR /etc/init.d/sendmail start

How to stop the SMTP service on Linux?
# service sendmail stop     OR /etc/init.d/sendmail stop

How to check the status of the SMTP service on Linux?
# service sendmail status   OR /etc/init.d/sendmail status

What is the default port for the SMTP server?
25


How to check the SMTP port is listening or not on Linux?
netstat –nat | grep 25


Linux Tool for system configuration and administration


Here is some important Graphical User Interface and Text Based interface tool on Linux.

# setup
Authentication Configuration
# authconfig-tui

Keyboard Configuration
# system-config-keyboard

Firewall Configuration
# system-config-securitylevel
# system-config-securitylevel-tui

Network Configuration
# system-control-network
# system-config-network-tui

System Services
# system-config-services


Timezone Configuration
# system-config-time

X Configuration
# system-config-display

Sunday, November 27, 2011

Understanding Linux Directory Structure


/bin - It contains all the command line programs that are accessible to the users.  For example ln, mkdir, mount, ping, sync and etc...


/boot - All the files (Like kernel…) which are required to boot up the system are here. 


/dev – In Linux, all the devices that are connected to the system will be treated like a directory/file. These virtual directories will be here. For example,  floppy, hard Drive, ram, audio and cdrom.


/etc – The configuration files for the operating system will be here. These are just a text files which can be edited by the user to change the configuration. Binaries files shouldn’t be kept here. For example,  hosts, httpd, cron, passwd and etc…


/home – The default home directory for a non-root user will be here when a new user is added.  For example, if /home/username, /home/akila


/lib – Shared libraries and kernel modules will be here. These files will be represented by ‘.so’.
It is similar to “DLL” in windows operating system. 


/lost+found – If the Linux system is crashed, it will keep the files that it restores.

/media – This is the place for mounting removable disks like Floppy, CD-ROM…

/misc – This directory is for miscellaneous purposes.

/mnt – In Linux everything will be considered a directory/file. To access the external devices, it should be attached to any of the directory in the file system. This is called mounting. The mount points for the each external device will be here.

/net – It is mount point for entire remote file systems.

/opt – The third party software will be stored here.

/proc – It is a virtual directory (doesn’t exist physically) like /dev, contains the process related information. The systems hardware information can be stored here. For example, zoneinfo, meminfo and etc…

 
/root – It is a default home directory for the root user.


/sbin – System administrators programs are stored here.


/srv – It contains site-specific data which is served by this system.

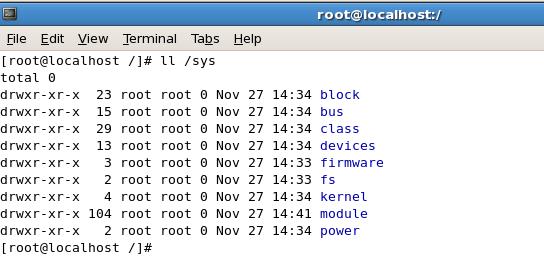
/sys – It is similar to /proc. It contains information about the devices that are connected to the system. It is a kernel file system.


/tmp – A directory to keep temporary files used by the programs.

/usr – All user-related programs, libraries and documentations will be stored here.


/var – This directory contains variable data that keeps on changing. For example, logs, mail ..


Wednesday, November 9, 2011

My SQL - Database related commands

  • 1. How to create database?
    • # CREATE DATABASE database_name;
    • Ex: CREATE DATABASE employee;
  • 2. How to give permissions to a user to access the database?
    • # GRANT ALL PRIVILEGES ON database_name.* TO username@server IDENTIFIED BY 'password'
    • Example: # GRANT ALL PRIVILEGES ON database TO 'akila'@'localhost' IDENTIFIED BY 'akila';
  • 3. How to delete a database?
    • #DROP DATABASE database_name;
    • Ex: #DROP DATABASE test;

Wednesday, November 2, 2011

Inject properties file into Bean using spring framework

Step 1: Download the latest spring framework from the official site http://www.springsource.org/download and extract the distribution. The necessary jar files for this example is.

org.springframework.asm-3.1.0.RC1.jar
org.springframework.beans-3.1.0.RC1.jar
org.springframework.context-3.1.0.RC1.jar
org.springframework.core-3.1.0.RC1.jar
org.springframework.expression-3.1.0.RC1.jar
commons-logging-1.1.1.jar

Note: The spring framework jar files will be in spring-framework-distribution/dist folder

Step 2: Create a Java Project named “SimpleSpring”.

File --> New --> Java Project 
    Create config folder to keep all the spring configuration related xml files.
    Create lib folder to keep all the necessary jar files.
    Create src/main folder to keep the java files.
    Create src/resources folder to keep resources related files.

Add these folders and the jar files in the project’s classpath.
To do this, just right click on the project --> Properties --> Java Build Path


   The final Structure of the project is like this.

Step 3: Create default.properties file under the resources folder and add the following. These values will be injected into Bean using Spring Framework.
      username=testuser
      password=testpasswd

Step 4: Create spring-config.xml in the config folder and the following.

<?xml version="1.0" encoding="UTF-8"?>
<beans xmlns="http://www.springframework.org/schema/beans"
  xmlns:xsi="http://www.w3.org/2001/XMLSchema-instance" xmlns:context="http://www.springframework.org/schema/context"
  xmlns:util="http://www.springframework.org/schema/util"
  xsi:schemaLocation="http://www.springframework.org/schema/beans http://www.springframework.org/schema/beans/spring-beans-3.0.xsd
  http://www.springframework.org/schema/context http://www.springframework.org/schema/context/spring-context-3.0.xsd
                           http://www.springframework.org/schema/util http://www.springframework.org/schema/util/spring-util-3.0.xsd">
  
  <bean class="org.springframework.beans.factory.config.PropertyPlaceholderConfigurer">
      <property name="locations">
        <list>
          <value>classpath:default.properties</value>          
        </list>
      </property>
    <property name="ignoreUnresolvablePlaceholders" value="true"/>
  </bean>
  
  <!-- Inject the properties of default.properties file into appConfig instance -->
  <bean id="appConfig" class="ae.gov.dmi.polopoly.AppConfig">
   <property name="userName" value="${username}"></property>
   <property name="password" value="${password}"></property>
  </bean>  
</beans>


The Spring Framework reads information from the default.properties file and inject into the appConfig instance.

Step 5: Create AppConfig java file
package com.spring.example;

public class AppConfig {
 private String userName;
 private String password;
 
 public String getUserName() {
  return userName;
 }
 
 public void setUserName(String userName) {
  this.userName = userName;
 }
 
 public String getPassword() {
  return password;
 }
 
 public void setPassword(String password) {
  this.password = password;
 } 
} 

Step 6: Create Main class and add the following
package com.spring.example;

import org.apache.log4j.Logger;
import org.springframework.context.ApplicationContext;
import org.springframework.context.support.ClassPathXmlApplicationContext;

public class Main {
 
 private static final Logger logger = Logger.getLogger(Main.class);
 
 public static void main (String[] args){
  
  logger.info("Starts");
  ApplicationContext context = new ClassPathXmlApplicationContext("spring-config.xml");
  
  AppConfig appConfig = (AppConfig) context.getBean("appConfig");
  
  System.out.println(appConfig.getUserName());
  logger.info("Ends");
 }
}


Step 7: Run the Main class. This program outputs the username which is configured in the default.properties.

Wednesday, October 19, 2011

Hibernate with Annotations


In this tutorial, Java Annotation is used to simplify the mapping configuration. This program is same as this example except some small change in the Persistence class and the "hibernate.cfg.xml".


Step 1: Download the latest version of the Hibernate from the official site. http://www.hibernate.org/ and extract the distribution to desired folder. 

Step 2:  
This example program requires the below jar files. These files are in the Hibernate distribution that you have downloaded.

       hibernate-distribution-3.6.7.Final\lib\required\antlr-2.7.6.jar
       hibernate-distribution-3.6.7.Final\lib\required\commons-collections-3.1.jar
       hibernate-distribution-3.6.7.Final\lib\required\dom4j-1.6.1.jar
       hibernate-distribution-3.6.7.Final\lib\required\javassist-3.12.0.GA.jar
       hibernate-distribution-3.6.7.Final\lib\required\jta-1.1.jar
       hibernate-distribution-3.6.7.Final\lib\required\slf4j-api-1.6.1.jar

       hibernate-distribution-3.6.7.Final\lib\jpa\hibernate-jpa-2.0-api-1.0.1.Final.jar

       hibernate-distribution-3.6.7.Final\hibernate3.jar

       Download the latest version of the MySQL connector jar file from http://dev.mysql.com/downloads/connector/j/        mysql-connector-java-5.0.5-bin.jar

Step 3: Create a My SQL database to connect from the hibernate.

      CREATE DATABASE test;
      USE test;
      CREATE TABLE employee (
               id  INT NOT NULL AUTO_INCREMENT   PRIMARY KEY,
               first_name VARCHAR(25) NOT NULL,
               last_name VARCHAR(25) NOT NULL
      );

Step 4: Create a java project in Eclipse IDE
  1. File ----> New ----> Java Project
  2. Enter project name and click finish.
  3. Create a lib folder under the project and add required jar files for hibernate.
  4. Now add these jar files in the class path to avoid compilation errors. To do this, right click on the project ----> Properties ----> Java Build Path ----> Add Jar ----> Go to lib folder ----> Select all the jar files.
Step 5:  First create a Persistence class. The mapping between the Persistence class and Table has been done using Java Annotation.

package com.hibernate.example;

package com.hibernate.example;

import javax.persistence.Column;
import javax.persistence.Entity;
import javax.persistence.Id;
import javax.persistence.Table;

@Entity
@Table (name="EMPLOYEE")
public class Employee {
 
 @Id 
 @Column (name="ID")
 private int id;
 
 @Column (name="FIRST_NAME")
 private String firstName;
 
 @Column (name="LAST_NAME")
 private String lastName; 

 public int getId() {
  return id;
 }
 public void setId(int id) {
  this.id = id;
 }
 public String getFirstName() {
  return firstName;
 }
 public void setFirstName(String firstName) {
  this.firstName = firstName;
 }
 public String getLastName() {
  return lastName;
 }
 public void setLastName(String lastName) {
  this.lastName = lastName;
 } 
}

Step 6:  Create a folder named "config" to keep all the configuration files in one place.

Create xml file "hibernate.cfg.xml" under the config folder.

Add this config folder in the build path. To do this, Right Click on the project ---> Java Build Path ---> Sources Tab ---> Add Folder ---> Select the config folder.

Now the configuration files have been successfully added on the projects build path.


Step 8:  Edit the hibernate.cfg.xml file and add database connectivity details.

<?xml version="1.0" encoding="UTF-8"?>
<!DOCTYPE hibernate-configuration PUBLIC
"-//Hibernate/Hibernate Configuration DTD//EN"
"http://hibernate.sourceforge.net/hibernate-configuration-3.0.dtd">

<hibernate-configuration>
 <session-factory>
  <property name="hibernate.connection.driver_class">com.mysql.jdbc.Driver</property>
  <property name="hibernate.connection.url">jdbc:mysql://localhost/test</property>
  <property name="hibernate.connection.username">root</property>
  <property name="hibernate.connection.password">akila</property>
  <property name="hibernate.connection.pool_size">10</property>
  <property name="show_sql">true</property>
  <property name="dialect">org.hibernate.dialect.MySQLDialect</property>
  <property name="hibernate.hbm2ddl.auto">update</property>
  <!-- Map the class file -->
  <mapping class="com.hibernate.example" />
 </session-factory>
</hibernate-configuration>

Step 9: Create a class to insert a record into the employee table using hibernate.
package com.hibernate.example;

import org.hibernate.Session;
import org.hibernate.SessionFactory;
import org.hibernate.Transaction;
import org.hibernate.cfg.Configuration;

public class Main {
 public static void main(String[] args) {

  Session session = null;
  try {
   // Open Session
   SessionFactory sessionFactory = new Configuration().configure().buildSessionFactory();
   session = sessionFactory.openSession();
   // Start Transaction
   Transaction tx = session.beginTransaction();

   System.out.println("Insert");

   Employee employee = new Employee();
   employee.setId(1);
   employee.setFirstName("Akila");
   employee.setLastName("Rajendran");
   
   //Save the session
   session.save(employee);
   tx.commit();

   System.out.println("Done");
  } catch (Exception e) {
   System.out.println(e.getMessage());
  } finally {
   session.flush();
   session.close();
  }
 }
}

Step 10: Run the project and check the database.


You might also like this:
  1. Hibernate simple example

Tuesday, October 18, 2011

Hibernate simple program

Step 1: Download the latest version of the Hibernate from the official site. http://www.hibernate.org/ and extract the distribution to desired folder. 

Step 2: 
This example program requires the below jar files. These files are in the Hibernate distribution that you have downloaded.

       hibernate-distribution-3.6.7.Final\lib\required\antlr-2.7.6.jar
       hibernate-distribution-3.6.7.Final\lib\required\commons-collections-3.1.jar
       hibernate-distribution-3.6.7.Final\lib\required\dom4j-1.6.1.jar
       hibernate-distribution-3.6.7.Final\lib\required\javassist-3.12.0.GA.jar
       hibernate-distribution-3.6.7.Final\lib\required\jta-1.1.jar
       hibernate-distribution-3.6.7.Final\lib\required\slf4j-api-1.6.1.jar

       hibernate-distribution-3.6.7.Final\lib\jpa\hibernate-jpa-2.0-api-1.0.1.Final.jar      
      
       hibernate-distribution-3.6.7.Final\hibernate3.jar
    
       Download the latest version of the MySQL connector jar file from http://dev.mysql.com/downloads/connector/j/        mysql-connector-java-5.0.5-bin.jar

Step 3: Create a My SQL database to connect from the hibernate.

      CREATE DATABASE test;
      USE test;
      CREATE TABLE employee (
               id  INT NOT NULL AUTO_INCREMENT   PRIMARY KEY,
               first_name VARCHAR(25) NOT NULL,
               last_name VARCHAR(25) NOT NULL
      );

Step 4: Create a java project in Eclipse IDE
  1. File ----> New ----> Java Project
  2. Enter project name and click finish.
  3. Create a lib folder under the project and add required jar files for hibernate.
  4. Now add these jar files in the class path to avoid compilation errors. To do this, right click on the project ----> Properties ----> Java Build Path ----> Add Jar ----> Go to lib folder ----> Select all the jar files.
Step 5:  First create a Persistence class.
package com.hibernate.example;

public class Employee { 
 private int id; 
 private String firstName; 
 private String lastName; 

 public int getId() {
  return id;
 }
 public void setId(int id) {
  this.id = id;
 }
 public String getFirstName() {
  return firstName;
 }
 public void setFirstName(String firstName) {
  this.firstName = firstName;
 }
 public String getLastName() {
  return lastName;
 }
 public void setLastName(String lastName) {
  this.lastName = lastName;
 } 
}

Step 6:  Create a folder named as "config" to keep all the configuration files in one place.

Create xml files "employee.hbm.xml" and "hibernate.cfg.xml" under the config folder.

Add this config folder in the build path. To do this, Right Click on the project ---> Java Build Path ---> Sources Tab ---> Add Folder ---> Select the config folder.

Now the configuration files have been successfully added on the projects build path. 


Step 7: Map the Employee Persistence class to the Employee table in hibernate mapping file (employee.hbm.xml).
<?xml version="1.0"?>
<!DOCTYPE hibernate-mapping PUBLIC 
"-//Hibernate/Hibernate Mapping DTD 3.0//EN"
"http://hibernate.sourceforge.net/hibernate-mapping-3.0.dtd">

<hibernate-mapping>
 <class name="com.hibernate.example.Employee" table="Employee">
  <id name="id" type="int" column="id">
   <generator class="increment"></generator>
  </id>

  <property name="firstName">
   <column name="first_name" />
  </property>
  <property name="lastName">
   <column name="last_name" />
  </property>
 </class>
</hibernate-mapping>

Step 8:  Create hibernate configuration file where we have to enter all the necessary information to connect to the data base. The configuration file should be named as "hibernate.cfg.xml".
<?xml version="1.0" encoding="UTF-8"?>
<!DOCTYPE hibernate-configuration PUBLIC
"-//Hibernate/Hibernate Configuration DTD//EN"
"http://hibernate.sourceforge.net/hibernate-configuration-3.0.dtd">

<hibernate-configuration>
 <session-factory>
  <property name="hibernate.connection.driver_class">com.mysql.jdbc.Driver</property>
  <property name="hibernate.connection.url">jdbc:mysql://localhost/test</property>
  <property name="hibernate.connection.username">root</property>
  <property name="hibernate.connection.password">akila</property>
  <property name="hibernate.connection.pool_size">10</property>
  <property name="show_sql">true</property>
  <property name="dialect">org.hibernate.dialect.MySQLDialect</property>
  <property name="hibernate.hbm2ddl.auto">update</property>
  <!-- Mapping files -->
  <mapping resource="employee.hbm.xml" />
 </session-factory>
</hibernate-configuration>

Step 9: Create a class to insert a record into the employee table using hibernate.
package com.hibernate.example;

import org.hibernate.Session;
import org.hibernate.SessionFactory;
import org.hibernate.Transaction;
import org.hibernate.cfg.Configuration;

public class Main {
 public static void main(String[] args) {

  Session session = null;
  try {
   // Open Session
   SessionFactory sessionFactory = new Configuration().configure().buildSessionFactory();
   session = sessionFactory.openSession();
   // Start Transaction
   Transaction tx = session.beginTransaction();

   System.out.println("Insert");

   Employee employee = new Employee();
   employee.setId(1);
   employee.setFirstName("Akila");
   employee.setLastName("Rajendran");
   
   //Save the session
   session.save(employee);
   tx.commit();

   System.out.println("Done");
  } catch (Exception e) {
   System.out.println(e.getMessage());
  } finally {
   session.flush();
   session.close();
  }
 }
}

Step 10: Run the project and check the database.


You may also like this:

  1. Hibernate with Annotations