Menu

Thursday, June 2, 2011

EJB3.0 - Stateless Session Bean and lookup in Servlet


Create EJB Project in NetBeans

1.       Create a EJB project. Go to File --> New Project --> Java EE --> EJB Module


2.       Enter name of the EJB project.


3.       Select the server. Here I have selected Glassfish and the Java EE version.

 5.       Now EJB Project is created.


Create a  Stateless Session Bean
1.       Enter name of the session bean.
2.       Select the package.
3.       Select the session bean type. I have selected Stateless session bean.
4.       Select remote / local interface.
5.       Click finish button.

6.       The stateless session bean and corresponding remote interface is created by the Net beans.

Declare methods in the remote interface.
The @Remote annotation tells the container that this is a Remote interface.

package com.ejb;
import javax.ejb.Remote;

@Remote
public interface EmployeeRemote {
    public String getEmpName();
}

Implement all the methods in the session bean.
1.       The bean should implement the remote / local interface.
2.       The @Stateless tell the container that this is a stateless bean.
3.       This stateless session bean is mapped to “ejb/EmployeeJNDI”. We can look up this bean in other programs.

package com.ejb;
import javax.ejb.Stateless;

@Stateless (mappedName="ejb/EmpJNDI")
public class Employee implements EmployeeRemote {

    public String getEmpName() {
        return "Akila";
    }
}

Deploy the project.
1.       Right click the project and click deploy.
2.       View the admin console of the glassfish server.
3.       The EJB is deployed successfully in the server.


Access the Stateless Session Bean in the servlet
1.       Create a web project.  File --> New Project --> Java Web -->  Web Application
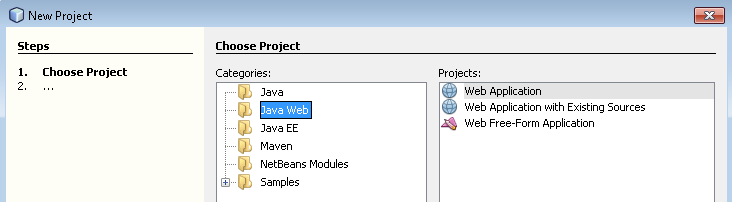

2.       Enter name of the project.

3.       Select the server and click finish.
 

4.       Create a servlet class.


5.       To access the EJB, the EJB jar file should be in the class path of the web application.
6.       To add EJB jar – Go to MyWeb --> Properties à Libraries --> Add Project --> Select the EJB project --> select the EJB jar file.                                     

7.       Add the below code in your servlet class file.
          //Lookup the EJB from JNDI
           InitialContext ctx = new InitialContext();
           EmployeeRemote  empRemote = (EmployeeRemote)ctx.lookup("ejb/EmpJNDI");
           out.println ("Lookup success");              
           out.println (empRemote.getEmpName());
8.       Deploy the project.
9.       Run the project.

How to explicitly lookup EJB?

//Lookup the EJB from JNDI
InitialContext ctx = new InitialContext();
EJBBeanRemote remoteobj = (EJBBeanRemote)ctx.lookup("mappedname of ejb");

How to lookup By @EJB annotation?

@EJB (mappedName="ejb/EmpJNDI")
 private EmployeeRemote empRemote;

Here the container injects the instance of the remote EJB bean by the annotation.

How to lookup EJB by ejb-ref?

Add the EJB reference in the web.xml file
       empEJB
        com.ejb.EmployeeRemote
        ejb/EmployeeJNDI
In the servlet class, add the below code.

InitialContext ctx = new InitialContext();
EmployeeRemote empRemote = (EmployeeRemote) ctx.lookup("java:comp/env/empEJB");

Wednesday, June 1, 2011

Install wget and download files using it

How to install wget in Windows?


Step 1: Download wget.exe file from net.

Step 2: Add the location where this file is saved in the path variable.

Step 3: Go to command prompt and type wget.


How to install wget in Linux?

In linux, wget will be installed by default. If not, do yum search and install the latest version
>yum search wget
>yum install wget.XXXX


How to download a file from web using wget command?

wget [OPTIONS] [URL]

The below command will download the page from google and save it google.html file. The \ is line separator in Linux. In windows ^ is a line separator.

    wget      --quiet \
                 --timeout=30 \
                 --dns-timeout=30 \
                 --connect-timeout=30 \
                 --read-timeout=30 \
                 --tries=5 \
                 --waitretry=5 \
                 --timestamping \
                 --output-document google.html \
                 http://www.google.com

Here are some of the interesting options in wget.
  1. timeout              - Specify timeout            
  2. dns-timeout        - Dns lookup timeout
  3. connect-timeout - connection timeout
  4. read-timeout      - reading  timeout
  5. tries                - how many times it should try to download
  6. waitretry            - how many times it should retry to download
  7. timestaming          - Don’t download if it is newer than the local file.
  8. output-document   - save the download page in this file
  9. quiet                - Don’t output log
  10. verbose              - output the log
  11. ftp-user             - username of the ftp server, if you download using ftp protocol.
  12. ftp-password         - password of the ftp user

    Run an application which is packaged as a jar file

    Step 1: Write a simple java class.
    package com.jar;
    public class HelloWorld {
        public static void main (String[] args) {
            System.out.println ("Hello World");    
        }
    }
    

    Step 2: Create a Manifest.txt file and add the main class which has "public static void main" method. The text file should be end with the new line otherwise the jar utility will not parse it properly. You will get this error - "Failed to load Main-Class manifest attribute from".

         Main-Class: fully qualified name of the class
         Ex: Main-Class: com.jar.HelloWorld

    Step 3: Package this class as a jar file.

          > jar cfm HelloWorld.jar  Manifest.txt com*.*

          c means "create an archive file"
          f means "Specify the archive file name"
          m means "include the manifest information from specified manifest file"

    Step 4: Run the jar file as below

         > java –jar HelloWorld.jar

         The out of the program
         >Hello World